How to host your Telegram Bot on an EC2 Instance [Windows Guide]

Hi everyone! today we’ll be looking at running our very own telegram bot through an EC2 instance. Before we get started, this guide assumes you have already created your telegram’s botfather (through telegram) as well as an AWS account. If not, you can go ahead and do so now 🙂
There are 4 main steps in this guide:
- Provisioning an EC2 Instance
- SSH-ing into your EC2 Instance
- Installing required dependencies
- Starting up your bot [this really isn’t a step, but I’ll just keep it here 🤔]
If you’re ready, lets get started!
1. Create EC2 instance
First things first. Time to get your EC2 up and running. This step assumes you are already logged into the management console. Hit ‘Launch Instance’ from the EC2 homepage.

For this tutorial, we won’t be worrying about additional settings, so go ahead and hit ‘Review and Launch’ after selecting the above AMI [we’ll be leaving everything at the default settings]. When you’re ready, hit ‘Launch’.

You should now see a pop-up box prompting you to select a key pair — either from an existing source or by creating a new one. I’ll be selecting an existing key pair I had already created. Feel free to create a new one, just ensure you download the new key-pair file and keep it somewhere safe (we’ll be using it in the next step).
Finally hit ‘Launch’. Your EC2 instance should be in the process of being provisioned right now [takes about a minute to get running]
2. Connect to EC2 instance
Now, head over to ‘Instance’ on the side bar, you should see a list of EC2 instances you have provisioned. Before moving on, ensure the instance you just launched has it’s status at ‘running’ (also indicated with a green circle)
- Open up Command prompt
- Navigate to the folder where your key-pair file is stored and
- Run the following:
# replace <KEY_PAIR_NAME>/<YOUR_EC2_PUBLIC_IP> with your credentials
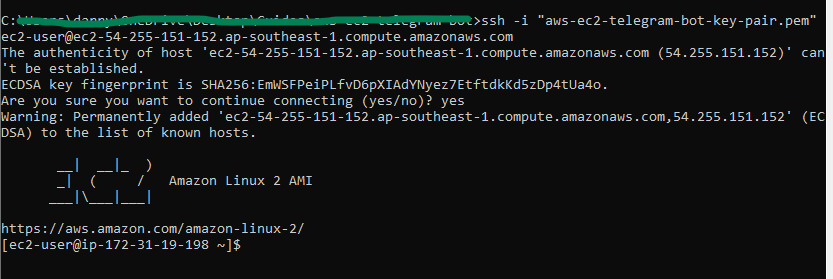
ssh -i "<KEY_PAIR_NAME>.pem" ec2-user@<YOUR_EC2_PUBLIC_IP>To find out your instances public IP address:
Select ‘Instances’ from the side bar → select your instance → Details → Public DNS(IPV4) address
Once you have successfully connected to your EC2 instance, you should see the following:
3. Install Dependencies & Run bot
Install Github
I’ll be pulling some starter code from an existing github repository. If you have your own code base, simply replace the github link below with the link to your repository.
# installing Git
sudo yum update -y
sudo yum install git -y# check installation
git version# clone telegram bot repository
git clone <https://github.com/darryleong95/aws-ec2-telegram-bot.git>
Install Node
# install node
curl -o- [<https://raw.githubusercontent.com/nvm-sh/nvm/v0.34.0/install.sh>](<https://raw.githubusercontent.com/nvm-sh/nvm/v0.34.0/install.sh>) | bash
. ~/.nvm/nvm.sh
nvm install node
node -e "console.log('Running Node.js ' + process.version)"
Install project dependencies
# install dependencies
cd aws-ec2-telegram-bot
npm install
If you’re using the template code I provided above, there’s one more step you need to perform before running the bot! If not, you can move onto the last step [Start the Bot]. If you take a look at the starter code, our server.js file makes use of a variable ‘TOKEN’ from the.env file. However as the .env file has not yet been created, we will need to do that now.
# from your project root directory, run
cat > .env# this will create and open up .env, allowing you to add text here.
Replace the <YOUR_API_BOT_TOKEN> with your API token — you can get this from botfather. Once done, simply hit ‘CTRL-D’, this should exit the file. To check whether you have correctly created and written to your .env file, simply run :
# this should print the files contents
cat .env
4. Start the Bot
It’s finally time to run your bot! Normally, simply running ‘node server.js’ at this point would be sufficient to start your bot. However this would not work as terminating the SSH session later on would stop this process. The solution to this are screens, screens allow you to run multiple processes (through multiple screens) in the background even when the SSH session is terminated later on. To launch a new screen, run the following:
# create new screen
# -S to specify a name for your screen
screen -S "telegram-bot"# start telegram bot
node server.js# Detach from current screen: CRTL A + D# to reattach screen later on
screen -r telegram-bot
It’s time to put your bot to test! If you used the template provided in my github repository, you should see the following after sending a message to your own telegram bot:

Phew, We’re done!
If you’ve managed to follow this far, Great job! You’ve successfully got your very own telegram bot up and running with an AWS EC2 instance!
If you found this guide helpful in anyway please let me know, or if you have any questions / critiques, please leave them in the comments below. I’ll be more than happy to provide assistance.